


If you are expecting a great sewing tutorial I will have to preface this post with a disclosure…

yes, I can sew, sort of…I pretty much stumble bumble my way through…

so while I AM going to show and tell you as best I can how to make this pretty cake, you are going to have to stumble bumble along with me, and all you seamstresses out there, close your eyes! Especially my friend Kim over at Curtain Queen Creates, now she can really sew, head over there for some really great tutorials!

I will confess right off the bat that the idea for this table runner came from a photo I’ve had on one of my Pinterest boards for 2 years. It is a kitchen towel

from less than perfect life of bliss~ Incredibly cute yes?

I shamelessly copied the whole thing! But here’s the thing, when you “borrow” and idea, or get an inspiration from someone elses creation, you inevitably make it your own~ See How to Steal Like an Artist~ just make sure to credit the original source… and then go your own merry way~skip down your own path and see where it leads you…

Make a template with a folded piece of paper and place it on a folded piece of fabric

and, Voila! Cake plate!

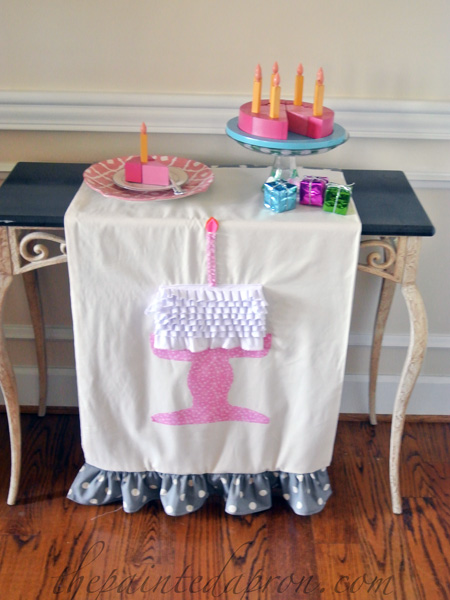
I decided to make a banner/runner, so it could be draped on a table or hung on a door or wall

One end got a flat accent band and one end got a flirty little ruffle

just turn the hem and sides of the ruffle and stitch

For the main body I used a yard length of unbleached muslin, opened it up and sewed the flat band on one end. Then right sides together stitched the 2 long sides and the short band side, forming a “pillow case.” Then I turned it so right sides were out and sewed the machine hemmed ruffle across the open bottom edge and then all sides were finished. Clear as glass right??
I carefully stitched around the edge of the cake plate, about 1/8″ in, just to keep edges from fraying.

With Heat n Bond, I ironed it on to the runner

Time to bake the cake! The bottom layer is a pink edged ruffle and I realized when I tried to pin it in place that scotch tape was better than pins because the fabric was so bulky it wouldn’t lay flat when pinned.

If you look closely you can see the tape, it worked great holding the trim in place while I sewed it down, and I removed as I sewed.
More layers!

and layers and layers and layers

a ruffly ribbon makes a candle with a felt flame, a large orange piece of felt and a smaller pink piece~

I like it kinda wonky

Did I mention this was for a very special birthday?

CC is turning 1 soon!

I have to go all out for this occasion!

We can add a candle every year~
Thanks so much to less than perfect life of bliss for such a wonderful inspiration!
_______________________________
I will be sharing with these wonderful parties and blogs: